Showing posts with label photography technique. Show all posts

Thursday, August 1, 2019

What are the best camera settings for pelagic bird photography?

On my Canon EOS 7D with Canon EF 100-400mm 4.5-5.6 IS lens, these are the camera settings I start with at the beginning of the pelagic birding trip: Manual mode, shutter speed of 1/1250, an aperture of f/7.1, exposure compensation of plus one full stop, Continuous focus mode called AI servo, Auto ISO, Evaluative metering, and autofocus mode to 1 point AF. Of course, all my bird and wildlife photography uses RAW format and Automatic White Balance.

Over the years I've struggled to find the best camera settings for pelagic bird photography. I've finally settled on what works best for me for photographing birds from a boat at sea. Those are listed above. Now I'll tell you why I like them. I also found some recommendations from others that I'll share when they are different from my settings. Then I'll give you a great tip I received that helps me instantly dial in all the correct settings.

Note: This post assumes intermediate or advanced knowledge cameras and photography in general, and rather intimate knowledge of the settings and menus on your personal DLSR camera with telephoto lens. Your camera's user manual is your friend.

The reasons for my settings

Every camera/lens combination is unique. I have the older Canon 100-400 lens. It is a bit soft in focus when it is wide open. It takes sharper photos when the aperture is 7.1 or higher. The image stabilization will let me take hand-held photos down to 1/400 of a second or slower. Sometimes. But I find that 1/640 is as slow as I should go with a stationary bird, hand-held, on land. On a boat? Better get it up to 1/800 or higher. 1/1250 seems ideal for most of my photography. For fast-flapping birds, 1/2400 will freeze most wings. But I want to keep ISO to 1000 or under. The closer to ISO 100 the clearer and sharper will be my photos.


Monday, July 8, 2019

Stalking Birds: 25 tips: How to get close to birds without scaring them away

In my previous post I discussed whether it was really necessary to get closer to a bird. In some cases, to protect the welfare of the bird, it may be best not to approach closer. Likewise, if other people are desiring to see the bird, it would be rude to scare it off so that others couldn't enjoy it. And you don't want to harass birds, or give the impression that you are to onlookers.

You can learn to approach birds more closely without frightening them. Then again, you can remain still and have the birds come to you! Both these outcomes start with the same premise: Don't look threatening.

Approaching birds

Perhaps you have noticed in a park that some birds habituated to people remain only a few feet off the trail as bicyclists, hikers, and even dog walkers pass by. Yet you don't get as close as they did and don't even get your binoculars raised before the bird flies off! Why?

Think about it from the bird's perspective. People pass by all day, most paying them no attention. They are not a threat. Yet here come you, straight at the bird. Not only that, you are staring at the bird with these large unblinking glass eyes. Threat!

So your first fieldcraft tip is (#1) not to approach a bird directly. Make as if to pass the bird by. Meander. Curve your path gradually toward the bird. Don't stare at the bird while moving toward it. Look away. Watch it out the corner of your eye until you are closer. Then stop.

Next, (#2) as you approach carry your binoculars or camera up to your face. Birds are often spooked by arms raising suddenly or pointing. Rest your optics on your cheek as you approach, then slowly tilt your optics to your eyes.

Third, (#3) watch your step! Don't break a twig or scrape the gravel. A sudden noise and off they fly! Move slowly and steadily.

Watch the bird. (#4) Is it alert and watching you? Stop. Let it get used to you and get back to whatever it was doing before you showed up. Is it fidgeting? Twitching its wing? Standing up straighter? Nervously scratching? Raising the tail? It may already be too late. Back off. Wait. If the bird is comfortable singing, feeding, and just being a bird while you take photos, then you are the correct distance.

Diving water bird tip ("Dive and Dash") (#5): Diving ducks, loons, grebes--wait for the bird to dive. Count how long the bird stays down. Next time it dives, run forward, crouch down. Wait for it to resurface. It may move closer. If it resurfaces farther out and facing away, you've been spotted. It won't return.

Singing bird tip (#6): Singing males are more easily approached during the time they are belting out their song. In between phrases is when they fly. If they are singing you may be better off walking forward at that time. Avoid over-pursuing singing birds during this sensitive breeding season time.

Blue Grosbeak
Territorial Blue Grosbeak.
Auto tour tip (#7): Some refuges and nature reserves may have auto tour routes. Even some country roads with wide shoulders along fields or wetlands may have bird viewing and photography opportunities from inside your car.

Monday, July 1, 2019

Fieldcraft: Stalking Birds: Do you really need to get close?

Eyeball to eyeball with Greater Roadrunner
Back off buster!
Before I post the techniques for approaching birds closely, I must ask the question: "Do you really need to get closer to the bird?" Let's discuss two reasons not to approach the bird more closely.

Today's optics are good enough that you can happily observe a bird from a distance that does not disturb it. Therefore, I can only assume that if you want to get even closer to a bird, you probably are trying to photograph it.

If you can approach closely, take your photographs, then back away--without the bird flying--then you have been successful. If the bird flies, you've failed; you have disturbed it. Once you flush a bird it is not going to let you get that close again. There's no sense chasing after it. You had your chance, but it's over. Move on. Any further stalking becomes harassment.

Monday, June 3, 2019

Fieldcraft: Choosing your birding direction. Literally.

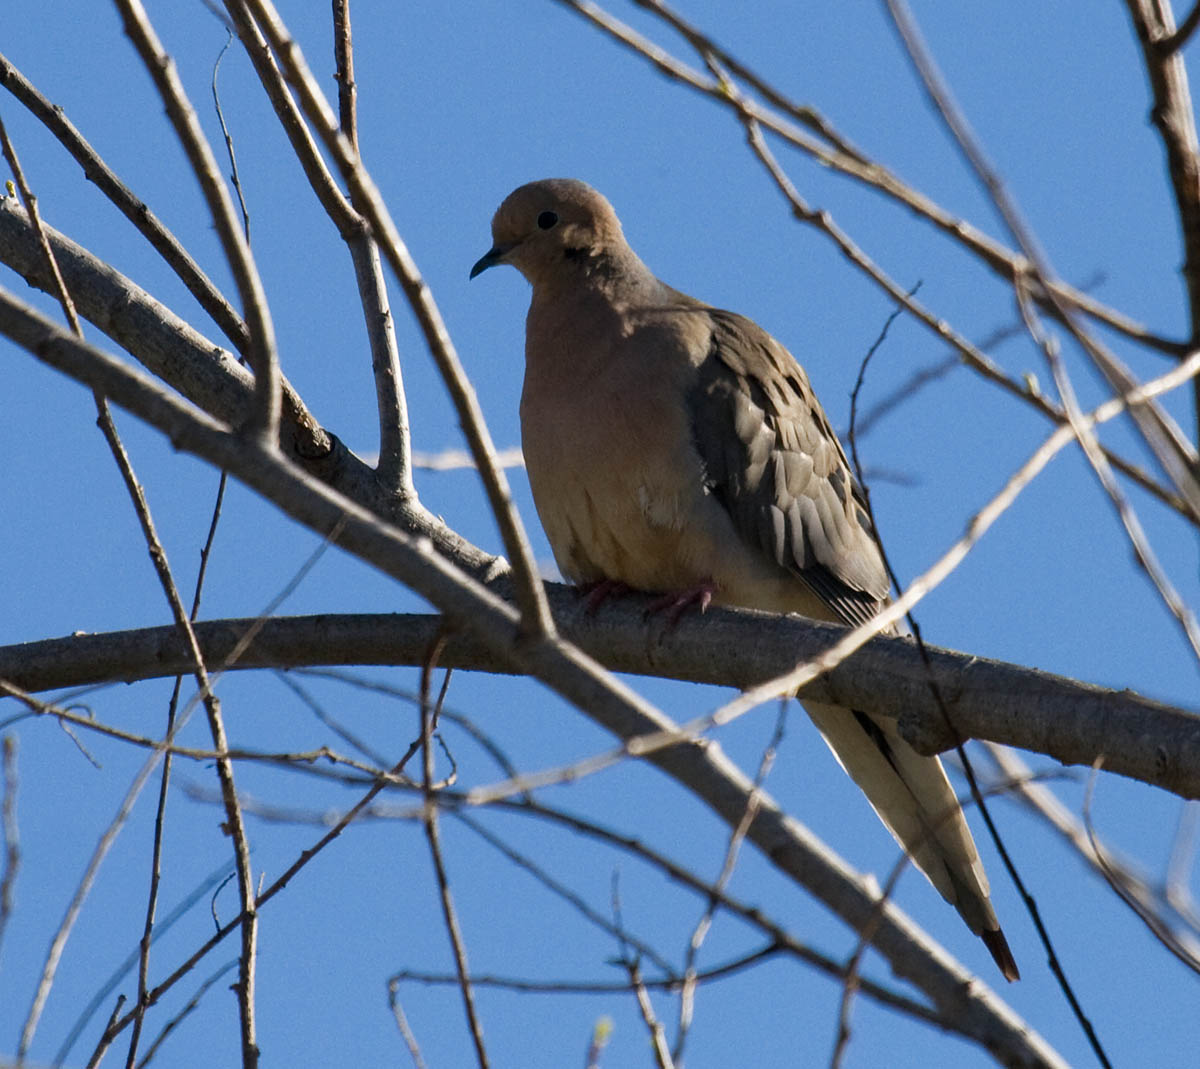
Mourning Dove in good light
Mourning Dove. Lake Hodges, California. December 1, 2013.
I can't be the only one. When I go bird watching I prefer loops to out-and-back spur trails. Don't you?

My thinking is: "I've already seen most of the birds on the trail I was just on. My chance for additional species seems higher to me on a different trail than to repeat the one I was just on."

So, when you start your birding walk and come to that fork in the loop path, which path will you take? If you say: "It's a loop; it doesn't matter," you would be wrong from a birding fieldcraft perspective.

The question is this: Do you want to glory in the beautifully colored birds lit warmly by the morning light? Or do you want to be squinting and see mostly silhouettes? I want you to think like a photographer now: point your shadow at the bird!

The sun rises in the east, more or less. In the northern hemisphere it rises in the northeast in spring and the southeast in winter. At dawn (and winter) the sun is low. If you start your birding by traveling east you'll be looking directly into the sun. However, if you start your loop by heading in a westerly direction first, looping to the right to the north, you'll start and stay in good light. Later, when you have to loop around toward the east and south, the sun will be higher, and less in your eyes.

So that's my advice to you. When you start your birding loop in the morning, choose to head off in a westerly direction first, then clockwise.

The difference can be night and day,... compare the first photo with this one:

Mounring Dove backlit
Mourning Dove backlit. San Elijo Lagoon, California. March 1, 2017.

Monday, February 11, 2019

My first attempt at video: Rock Wren at Lake Hodges

I got out before the rain, yesterday, to walk around Lake Hodges. I wanted to try video on my Canon 7D Mark II and 100-400mm lens.

The light conditions were not good. There weren't many cooperative birds. I don't have an external microphone and didn't use a tripod. The video wasn't too bad for my first attempt. If I do this in the future I must have the camera on a tripod.

Here it is:


I noted that the camera's microphone picked up distant traffic on the freeway, boat motors, and people walking on the gravel path. So I dropped audio way down. If I bought a microphone I could add narration. If I had a decent still shot I could insert that as well, but none of my photos really turned out. I used a very simple and basic video editor for my first time.

This could be addictive!

Sunday, February 3, 2019

On the web: Tim Boyer Photography: Basic Video for Bird Photography

Tim at Tim Boyer Photography has just completed a 3-part tutorial on his YouTube channel: Basic Video for Bird Photography.

I want to start shooting video with my camera. On my camera about 6 seconds of video is the same size as a single large RAW image, so there should be room on my memory card for over 2-1/2 hours of video, if my battery holds up.

Check out his 3 videos outlined as follows.

Part 1: The 3 Deadly  Sins (6:34) January 9, 2019
  • Bad audio
  • Shaky footage
  • Out-of-focus

Part 2: 7 Key Techniques to Master (7:45) January 16, 2019
  • Manual mode (24fps, shutter speed 1/50 sec)
  • Aperture (f8 for better depth of field, wide open for blurred background)
  • Constant white balance
  • ISO to adjust exposure
  • Lock-down shot
  • Short clips edited to 4-6 seconds each
  • Establishing shot, plan your story

Part 3: 7 More Things to Master (4:16) January 23, 2019
  • Tell a story (wide, medium, tight shots)
  • Shoot plenty of B Roll
  • Slow pan
  • Don't zoom in and out while shooting
  • Pull focus technique
  • Audio (dead cat, wireless mic)
  • Editing transitions

Tim has enabled sharing for Blogger, so I assume he wants me to share it with you. Here's the first part embedded.


Tim has also written a book on bird photography and leads photography workshop tours. Check it out on his webpage: Tim Boyer Photography.

Tuesday, January 1, 2019

My 10 best bird photos of 2018

Welcome to my second annual list of best bird photos from the past year.

My best photos from 2017 here.

Reddish Egret
Reddish Egret. San Diego River mouth, San Diego, California. August 12, 2018.
This high key photo of Reddish Egret is the one I'm most proud of for the year. It captures this rather rare bird in a typical, but exciting, pose. More photos of this bird are here.

Brown Pelican
Brown Pelican. San Diego Bay, California. August 19, 2018.
This immature Brown Pelican was photographed from the boat as we were coming back from a pelagic trip. The bird is photographed at eye level with warm afternoon light. It generally meets all the qualifications of an "artistic" bird photo. More.

Common Ground-Dove
Common Ground-Dove. Borrego Springs, California. March 18, 2018.
It's not perfect. The shadows of the noon sunlight are a bit harsh. There's no obvious catchlight in the eye. But I like it, perhaps because the species is uncommon. I especially like the pattern of the feathers across the breast and neck. More.

Scaly-breasted Munia. Escondido, California. August 10, 2018.
I chose this slightly smaller-in-the frame composition over a very similar one cropped a bit closer where the bird appears larger. The background grasses fade pleasingly away and the reddish-brown plumage of the bird stands out against the overcast sky reflected in the waters of the pond. More.

White-winged Dove
White-winged Dove. Anza-Borrego Desert State Park, California. April 15, 2018.
The dove is in more shadow than I would like, so I opened up the crop so the bird is small-in-frame in order to show more of the blooms on the ocotillo bush--a habitat shot. The mottled background of the out-of-focus desert hillside provides a nice texture contrast to the thorny bush. More.

Anna's Hummingbird
Anna's Hummingbird. Lake Hodges, California. January 21, 2018.
I have so many photos of hummingbirds, especially this common Anna's. Nevertheless, this is probably my best Anna's on a natural perch, even if it is a stereotypical bird-on-a-stick (BOAS). The focus, the light, the pose, and the background are all good. More.

Mountain Quail
Mountain Quail. Palomar Mountain, California. June 17, 2018.
Okay, maybe it's the backstory and not the photograph itself. The bird is in harsh sun and shade, aided by some reduction of contrast in post-production. But to encounter such a shy and reclusive bird right out in the open was a special treat. The backstory.

Great Egret high key
Great Egret. Lake Hodges, California. July 4, 2018.
My first high key photograph. Not bad for standing on the footbridge taking shots of herons and egrets as they flew up river against dark overcast skies. Practicing camera settings with my new camera. More about this photo and the High Key style.

Bell's Sparrow
Bell's Sparrow. Borrego Springs, California. January 7, 2018.
The small-in-frame and backlit sparrow is perched on a twisted creosote bush. The three main branches all lead the eye back to the bird in the center. This bird-in-habitat shot is more about the composition than the bird itself. The bird alone would be a poor shot. More.

Verdin
Verdin. Borrego Springs, California. March 18, 2018.
The head angle looking back at me is good and there is a wonderfully pleasing out-of-focus pastel-colored gradient background that complements the soft gray plumage of the bird. More.


Honorable mentions:

Gull-billed Tern
Gull-billed Tern. Imperial Beach, California. July 29, 2018.
The photo of this tern is not exceptional, with somewhat harsh overhead light. The head is in sunlight and the bird is in focus, but there is no catchlight in the eye. The background is solid blue sky which some find boring. But Gull-billed Tern is rather uncommon in US waters. And this photo captures it well. More.

Acorn Woodpecker
Acorn Woodpecker. Mount Laguna, California. October 7, 2018.
A pleasant but not exceptional photo of Acorn Woodpecker in the shade of the mountain forest. The diagonal perch adds some visual interest. It might have done better in warm early morning sunlight. More.

Marbled Godwit
Marbled Godwit. Imperial Beach, California. September 30, 2018.
This is an easy bird to photograph on southern California beaches. And photogenic, too, with those long legs and impossibly long upturned bill. There's nothing wrong with this photo, it's just such a common subject in a common pose. More.

Phainopepla
Phainopepla. Borrego Springs, California. March 18, 2018.
One of my favorite birds. If only its head had been turned more toward the camera!

Saturday, September 29, 2018

Bird photography at very high ISO

Camera settings for a bird in the bush

My new camera (Canon EOS 7D Mark II) has much better autofocus and ISO range than my previous Canon Digital Rebel XTi (bought in 2006). I've mentioned before that the XTi never had enough light with my 100-400mm zoom lens to use ISO 100, and that ISO 1600 was so grainy (digital noise--especially in shadows) I never used it. So I customarily set the ISO at 400 and aperture at f/7.1 and left it there, letting the camera choose the shutter speed.

On the other hand, the 7D Mark II has infinite ISO. Okay, so it's not infinite, but rather than 1600 it goes to 16000! And it even goes beyond that with special settings that I don't know why you'd use unless taking really grainy photos in near blackness.

I have learned to shoot Manual mode recently and often shoot Manual with Auto-ISO, at 1/1250 sec, f/7.1 @ 400mm as a default "birding" setting, as long as light is sufficient. For more active or flying birds a shutter from 1/2000 to 1/4000 sec stops motion as light permits.

However, when shooting "birds in the bush," hopping from sun to shade or backlit by bright skies, I use different settings.

Autofocus

There are a huge number of Autofocus settings on my camera. But for getting pinpoint focus through the branches on the face or even the eye, I use the Spot AF setting. It is smaller than the default single Autofocus point. I use this setting nearly always. Some of the other AF point selection modes are theoretically "better" for focusing, but I haven't found it to be so, at least on my present lens, which is the old Canon 100-400mm f/4.5-5.6 L IS. This lens is a bit soft in focus. The new lens in this series is supposedly much sharper. But as long as my present lens works I cannot afford to upgrade. Now that I can take 10 frames per second I am able to get some sharper, some fuzzier, in a burst.

Metering

For general bird photography the Evaluative Metering mode is ideal. The Evaluative mode takes into account the entire frame but is weighted more to the center. In RAW you can adjust the color temperature and restore the warm sunny tones you observed. So you don't mess with white balance in the field when shooting RAW.

In recent weeks, however, I've been shooting warblers in the trees against the backlit skies or in dense bushes under a cloudy marine layer and in shade. Jumping from over-bright to over-dark is very difficult--especially if you're chasing warblers through the foliage. If your subject bird takes up at least 15% of the frame width then you can use Spot Metering. In this case your bird is exposed properly even if the background sky is blown out, or the background shadows go to black. It's tricky though, especially for black-and-white birds, or if the bird isn't quite large enough so that you hit part of the bird and part of the background. So frame-to-frame shots may all be exposed slightly differently, depending upon how steadily you hold the focus on the exact spot on the bird. I would not use this Spot Metering mode on a pelagic trip, for instance, where the bird is too small in frame and there the bouncing of the boat, waves, and flying of the bird means that I can't hold steady.

So, I am still shooting Manual with the shutter speeds and aperture that allows me to get good photos with Auto-ISO. Shoot green grass in the open to give you an idea of proper Manual mode shutter, aperture, and ISO settings. Then set shutter and aperture as the green grass would indicate. Set Auto-ISO. Set Spot AF and Spot Metering.

This won't make artistic photographs. But it will give you properly exposed birds for documentation photos, even if the noise is severe. Noise can be smoothed when rendering your RAW files.

The photos below discuss shots of birds on September 16 and 21 of 2018 at Buddy Todd Park in Oceanside, California.

Hutton's Vireo
Hutton's Vireo in deep shade. 1/1250 sec, f/7.1 @400mm, ISO 10000.
It's grainy, but still usable.
Red-eyed Vireo
Red-eyed Vireo against bright sky. 1/1250 sec, f/7.1 @400mm, ISO 2500. 
Evaluative metering would have turned the sky gray and the bird very dark.
Black Phoebe
Black Phoebe and background in nice even light. 1/800 sec, f/7.1 @400mm, ISO 500.
Evaluative metering would have worked "better" but this came out perfect with Spot metering.
Townsend's Warbler
Townsend's Warbler in deep shade. 1/400 sec, f/5.6 @400mm, ISO 16000.
This is as shady a condition as one could obtain a sharply focused bird with my image stabilized lens.
Nuttall's Woodpecker
Nuttall's Woodpecker strongly backlit. 1/640 sec, f/5.6 @400mm, ISO 2000.
If Evaluative metering had been used the sky would have been gray and the bird and tree trunk black.
Western Tanager
Western Tanager in front of deep shadows. 1/1250 sec, f/5.6 @400mm, ISO 4000.
If Evaluative metering had been used the yellow parts of the bird would have been blown out.
Allen's Hummingbird
Allen's Hummingbird in shade. 1/1250 sec, f/7.1 @400mm, ISO 8000.
Evaluative mode would have turned the bird dark to compensate for some foliage in the light (cropped out).
With my previous camera only the phoebe had enough light to take a shot! While many of the "high ISO" shots aren't all that great, they are still sufficiently acceptable for documentation photos.

Thursday, September 6, 2018

Coot photography challenge

If you live in North America like I do you probably see American Coots every time you visit a pond or other wetland. If you photograph birds you probably have a bunch of photos just like this one:

American Coot
Typical coot photo.
There's nothing wrong with the photo above. It's just common. It looks like any other photo of American Coot on a sunny day.

Only a couple of minutes after I took the above photo, I took the photo below. What changed?

American Coot
American Coot. Dixon Lake, Escondido, California. August 31, 2108.
First of all I got down a lower so I wasn't shooting down at the bird, but joined it on its level. I wasn't able to get down completely to water level, such as laying on my belly on the shore. I sat on a low rock. But since the bird was a bit farther away the angle was more horizontal than the first photo where I was standing up on a bank.

Second, I chose a more muted background. In this case the bird was in a little inlet. The brown water color is the reflection of the nearby curving shore.

Because I wasn't photographing the bright reflected sky, I was able to adjust the exposure properly. This third change is that the white bill isn't over-exposed and blown-out as on the first photo.

The next time you are looking at a coot, grebe, or duck in your viewfinder I want you to remember this. If you find it looks like the first photo, then stop. Change your shooting angle. Change your composition and background. Change your exposure. I challenge you to take a more interesting shot!

Monday, September 3, 2018

Brown Pelicans photographed in golden light

Returning from the August 19 pelagic trip I noted that we had excellent warm "golden hour" light. As our boat entered the bay I obtained several photos of Brown Pelicans specifically to practice creating artistic photos in this soft light. I present them here with some commentary on the artistic aspects of each photo. [Read "7 elements of an artistic bird photo"]

Brown Pelican

#1. The photo above has soft light, is in focus, and has a good pose. The wind-rippled water background is perhaps just a bit too strongly patterned and distracting. This is alleviated in the following photos by getting closer to the bird and having more distance between the bird and the background elements.

Brown Pelican

#2. I really like the pose in the above photo. The background is clear blue sky. But the shadow on the underwing might be a touch too distracting for some. I'm shooting up at the bird just slightly, which isn't ideal.

Brown Pelican

#3. This photo above doesn't have quite as an interesting wing pose as the previous photo. But it is better in two other regards. It doesn't have a distracting shadow across the breast and the perspective is perfect at eye level. This might be the most technically "correct" of the photos here, though it is not my personal favorite.

Brown Pelican

The photo above really has nice warm golden light without any harsh shadows. The background has a couple of slightly distracting "blobs" on the water, and the brighter shoreline is a bit distracting too.

Brown Pelican
Brown Pelican. San Diego, California. 19 August 2018.
This final photo is one I really like. It really catches the golden glow of the late afternoon sun on it's brown feathers. The pose is really interesting. The wing is extended down and forward for added lift, the hand twisted slightly to reduce air drag as it is just beginning the upstroke. The wing is pleasingly patterned with all the parallel lines of the perfect juvenile flight feathers. The almost scale-like body feather texture is replicated on the wing coverts. You can really see this well if you click on the photo and bring up a size about 3 times larger than what appears on the screen. The shoreline is so subtle at the top that I don't think it detracts. The original had more shoreline, but I cropped as much out as I could. I could wish the faint darker wake shadow didn't go all the way across the frame and through the head. That's my only "complaint."

Tuesday, August 7, 2018

High Key Great Egret

High Key Great Egret

First of all, I have to say that I don't know if I'm doing this correctly. This is my first attempt at this artistic choice in rendering a photograph in this style.

The term high key photography comes from the motion picture industry. Lighting could come from the main or key light. A fill light was added on the shadowed side. A back light was included.

For high key photography, then, the background is exposed until it disappears. Light parts of the main subject blend into the white background. Only the dark portions of the subject contrast. It works quite well with black-and-white photos when the background is white or nearly so.

A professional example of a high key and a low key photograph is here.

I arrived at dawn hoping for the warm "golden hour" sunlight. Unfortunately, as often is the case in early summer, dawn arrived with a heavy marine layer (see Wikipedia "June Gloom."). I was on the footbridge over at Lake Hodges. Many herons and ibis were flying over me inland away from the lake.

The automatic exposure in the camera wants to turn the photo gray. Thus, here is the original photo, already using exposure compensation of +1/3 stop.

Great Egret
Great Egret. Lake Hodges, California. July 4, 2018.
1/1000, f/7.1 +1/3 @400mm, 800 ISO.
Next comes my first attempt at high key. I didn't push the background all the way. So I tried again with the photo at the top of the page.

Great Egret

What do you think?

Monday, July 23, 2018

7 elements of an artistic bird photo

Artistic or Documentation? What makes a good bird photo?

I came to bird photography from bird watching. I wanted to share what I was seeing with others. I was interested in documenting identification marks and behaviors. My goal was to take photos of birds I came across while I was birding--especially rare or hard-to-identify birds. I wanted "verifiable objective evidence" more than "art." And my usual birding routine was to walk a mile or two of trails during an hour or two in the morning. Setting up a photo for artistic appeal was not a primary consideration and, in fact, was not even possible until I upgraded my camera at the end of June 2018 with the Canon 7D Mark ii.

I've been adding photos to my eBird checklists since they first allowed them. Many of my photos reached the highest, 5-star, quality level. According to eBird the 5-star rating applies to common or rare birds. They are: "The best images possible. The birds should be sharp and well-lit, have a clean background, good composition, and be posed well." Such wonderful documentation photos meeting this definition may still not necessarily be artistically great photos.

What more is needed?

Once I ordered my new camera I started watching a lot of Arthur Morris/Canon YouTube videos. Recently I've been watching the Wildlife Inspired YouTube channel. A recent upload was: "We were all Beginner Wildlife Photographers Once," Wildlife Inspired, April 25, 2018.

In this hour plus video, Ray Hennessy and Scott Keys share their photos and discuss the aspects of artistic bird photography.

One point I heard, here and elsewhere (non-photography), was that beginners over-value their (skill/knowledge/expertise). They don't know how much they don't know. Thus they think they are better than they are. This could apply to driving a car, being a doctor, or creating artistic bird photos.

"Make a decision between the birder in you and the photographer in you." It is a joy to wander around watching birds while carrying a camera to document the birds you see. However, you are unlikely to create many truly artistic bird photos without forethought and planning. It requires being in the right place at the right time, planning for the light, creating the composition, and waiting for the bird.

Most of my bird photography is opportunistic. Even if I make plans to photograph a particular species, I haven't put advanced thought into the light and pose and composition that I want to capture. And I rarely spend more than 10 minutes with any one individual bird. But I've started to learn how to do so. None of the items presented here are of my own originality. In fact, I may never actually go on a photo shooting outing specifically for artistic shots. However, when the opportunity presents itself, I can make my documentation photos more artistic following these guidelines.

These, then, are what I understand to be the 7 components of an artistic bird photo.

1) Focus--
In nearly all cases, the eyes need to be open and sharply focused. A bright spot of sun or sky should reflect as a "catch light" in the bird's eye. Even if the back half of the bird is out-of-focus, if the eyes are sharp, most people consider the bird in focus. Silhouettes and some action shots might not show the eyes, but these are an exception. Flash can cause "steel eye" in birds. It is like "red eye" in people.

2) Light--
One of Arthur Morris's mantras is "point your shadow at the bird." I find, though, that a bit of shadow on one side can make the bird look more 3-dimensional and less flat. Most wildlife photographers want to shoot in "golden hour" light--just after sunrise and just before sunset with soft yellow light without the harsh shadows of full daylight. Strong daylight causes harsh shadows--the bird's eye will be shaded from overhead sun by the bird's brow. Or, the bird may choose to shade its eyes in the shadow of a branch or leaf. On the other hand, overcast conditions can provide soft light with few shadows as long as it lasts--even all day. And inclement weather (rain or snow) can provide interesting artistic opportunities as well.

3) Foreground and background--
The background will make or break your photo. A smooth out-of-focus background is pleasing to many bird photographers. A gradient is often pleasing. Clouds in the blue sky are frequently mentioned as desirable, rather than a solid blue sky. Sometimes all it takes is moving a few feet left or right to rid the frame of a distracting element. Bright out-of-focus building colors or unnatural geometric shapes--especially in water reflections--can really detract attention from the bird. Bright spots of light in the background are also a nuisance. In general, blur the background by shooting wide open aperture for shallow depth of field. Then get the camera closer to the bird and the background farther from the bird.

4) Perspective--
Don't shoot down, or up, at a bird. Get intimate with the bird by shooting at bird's eye level and joining the bird's world. This may mean laying on your belly to get the shot.

5) Action--
The BOAS ("bird on a stick") pose can often provide that nice clean background, but tends to be boring because of its commonness. Look to record interesting behaviors--feeding, singing, mating, flying--anything that gives life to your subject and tells a story.

6) Composition and cropping--
There are a lots of bird composition "rules." Learn them and use them frequently, but look for opportunities to create an interesting composition by breaking them. The "rule of thirds" breaks your photo into thirds horizontally and vertically, with points of interest on the intersections. Your bird should not be dead center in the frame, but probably on one of these thirds intersections. Most of the photos considered best have the body of the bird and the face facing the camera. If possible, the bird should be looking at the camera. In general, if you crop closely, the bird should have more space in front and above the head than the tail. The more you crop, the poorer the photo quality. If smaller in frame, compositions often look better with the bird facing into the frame rather than looking out of the frame. Try vertical or more square crops rather than the horizontal crop. Try small-in-frame "habitat" shots. Try head-on shots, not just profile shots. Experiment.

7) Editing--
Always shoot in RAW and make minor exposure adjustments in the post-processing. But always try to set your camera to make the best possible exposure for each shot. Some lenses are notorious for sucking dust into the camera sensor. So you may do clone stamping of sky or water to remove dust spots. "Contest editing" will only allow very minor edits to the original. Some photographers will edit out unsightly branches or insert clouds into an all-blue sky to make an artistic photo. Whether you choose to make such major changes to the original is up to you. Just be sure to acknowledge it.

_ _ _ _ _ _ _ _ 

Now I'll try to objectively review some of my better photos. I'll discuss both what is right and what is not-so-good about each photo. Please remember that in most cases I wasn't trying to make artistic photos, but some turned out good anyway.

Redhead
Redhead. Oceanside, California. 22 February 2015.
1/100, f/7.1 @ 400mm, ISO 400
What makes the Redhead above a good photo? Focus is sharp, even hand held at 1/100th of a second (my older camera didn't allow me to create good photos at higher ISO or wider f-stop). The day was overcast so there are no harsh shadows. The light reflection in the background is not ideal, but not overly distracting. I was able to shoot very low, eye-level with the duck. The bird is looking at me with slight head turn. This is a crop of about 80% of the original. There was another piece of a duck in the frame to the upper right that I cropped away. Other than some minor adjustments to exposure, no editing was done. Sadly, I no longer have the original RAW file.

Snowy Egret
Snowy Egret. Escondido, California. 13 December 2017.
1/500, f/7.1 @310 mm, ISO 400
This Snowy Egret is not super sharp because of the slow shutter speed, but the golden early morning light is very pleasing and desirable. Flight shots are always nice. Ideally, it would have been better for the bird to fly into the sun, so the breast wouldn't be in shadow. The background is perhaps a bit strong. Some photographers may have chosen to edit and soften the contrast of the watery background. This is not a full frame. I could have easily cropped so the bird was moved farther down and to the right to conform more to the rule of thirds, but it's not too bad the way it is.

Marbled Godwit
Marbled Godwit. Newport, Oregon. 11 September 2009.
1/1250, f/7.1 @400mm, ISO 400
If this Marbled Godwit was just standing there in the water it would not have been a very good photo. It is the open-winged pose, with the tension of anticipatory action, and splash of water on the leg, that makes this photo. The harsh light and shadow on the breast and face, in early afternoon is somewhat alleviated by sunlight reflected up from the water. There's no catch light in the eye. But it is the backlit primaries on the wing that really saves it, I think. The background fades away nicely, and is a great contrasting color. And I was as low as I could get without being in the water. The crop is more squared than most, to balance the wing. I could have cropped differently so the bird was more to the lower left of frame with more water to the right. This came from a series of photos of a rare Hudsonian Godwit (eBird checklist here) in among a flock of Marbled Godwits. I found a place on the shore and waited an hour for the tide to come in and push the bird closer to me. To get this pose was not as hard as you may think. I observed that the birds were resting on one leg. When the little tidal surge of waves came in the birds lost balance slightly and opened their wings to balance. I just waited for it.
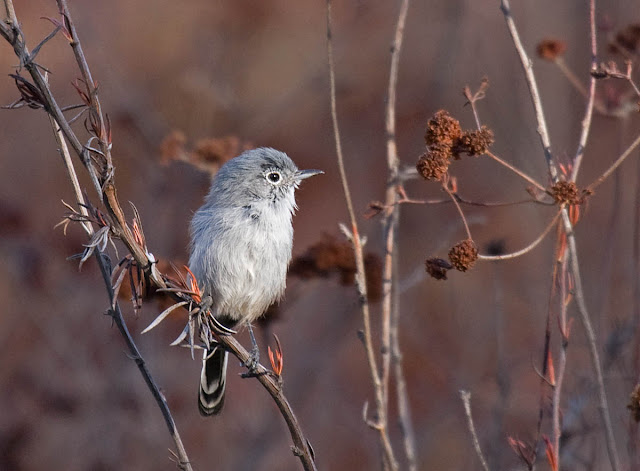
California Gnatcatcher
California Gnatcatcher on California buckwheat. Escondido, California. 11 October 2017.
1/200, f/7.1 @400mm, ISO 400
California Gnatcatchers are an endangered species found in coastal sage scrub in the San Diego region. I actually see them quite often in the local areas I go birding. And when I do, I always try to get a photo. This one turned out quite good. I especially like the interesting foreground stalks of California buckwheat that blur quickly into the background. The plant shape and texture is as much the subject as the bird. The earth tones match the gray and black of the bird. I think the focus is sharper on the tail--slightly behind the plane of the head. So the focus is not as crisp as it could be on the face. There might also be a bit of softness due to camera shake at the slow shutter speed. The early morning light is soft, perhaps slightly overcast as the shadows are present but not obvious. The perspective is good--pretty much level with the bird's head. There's no apparent action in this photo, but the bird is constantly on the move. I've cropped fairly heavily to remove more vegetation on both sides of the present crop. The crop is taller (more square) than the other crops on this page. I've put the left side of the body on the vertical line of the left third of the frame. The bird's pose is nice, but the head is tilted slightly away, looking ever-so-slightly behind. I have another shot with better head angle, but softer focus (eBird checklist with photos here). If I think about it much longer I may actually like the other photo better, despite the softer focus only noticeable when viewed at full size. With small birds in trees or brush you don't have as much control of the artistic elements. You can be out at the right time of day and facing the correct sun angle. But other factors are only in the control of the bird. If given a choice, the bird will always make you look into the sun! You just have to take lots of photos as the bird moves around. Look for openings and cleaner backgrounds, even while taking the shots. Overcast is better than sunny when shooting birds in the brush or branches when harsh shadows will ruin the shot. Territorial singing birds in spring will often remain out in the open on an exposed perch. That's the time to plan a specific shoot.